

How to use microscopes
By Catalogs Editorial Staff
Learn how to use microscopes for best results in scientific exploration
Come to find out, one doesn’t need to possess a PhD in a Biology to study cells, organisms, or other such samples. Whether in the comfort of your own home, at the school biology laboratory, or at work, science can be experienced by anyone. And — gasp — it can actually be fun.For example, focusing on the microscope, one only needs to have a basic knowledge and an understanding of all the moving parts. It’s actually not as difficult or time-consuming as it looks. In the coming paragraphs, we’ll give you a beginner’s course on the subject and show you how to use microscopes the right way. So, read on!
Types of Instruments
Before you continue reading about the How to use microscopes there is a special announcement we would like to share with you. Catalogs.com has negotiated special medicare rates for our vibrant community of seniors. If you are over the age of 60, you can head over to our Seniors Health Section which is full of information about medicare. All you need is your zip code and a few minutes of your time to potentially save 100s of dollars on your medicare bills.
There are are many uses for microscopes, and they come in many sizes. But it’s possible to group most microscopes into eight types. Home users will probably only use three or four of these, but it’s useful to know the options that exist out there.
- Stereo — Also known as a dissecting model, the stereo microscope offers lower power for the observation of plants, insects, jewels, stamps, coins, rocks, and more. Total magnification ranges run from 10x, 20x, 30x, 40x, and up to 90x . This is a fairly common type for home and classroom use, but is also important in labs and research facilities.
- Compound — Known as biological instruments, compound microscopes offer a high-power functionality that can be used for magnifying viruses, cells, and other such miniscule organisms. The common magnifications of the compound variety are 40x, 100x, 400x, 1000x, and 1600x. Compound optical instruments are used most commonly in schools, universities, labs, hospitals, and homes.
- Digital – Invented in Japan in 1986, the digital microscope eliminates the need to peer through a tiny eye-piece, while allowing users to see in much great detail than any mechanical microscope can match. Another plus? Scientists and students can save, print and e-mail images right from their computer. This type of microscope is becoming more and more popular among home and school users.
- USB Microscope – These tiny microscopes work to allow users to see details without any need to prep samples. The resolution and magnification is not as good as a digital or high end compound microscope, but the low price and ease of use makes it ideal for younger students or kids at home.
- Pocket microscopes – Scientists and hobbists in the field use pocket microscopes to examine plants, animals, rocks and other items in the field, allowing them to extend their lab into the whole outdoor world. Low end versions are great for kids, while more expensive digital models allow field observations to be saved and transmitted to a computer.
- Electron Microscopes – These powerful lab-based microscopes allow researchers to view samples at the nanometer level. Typical applications for these microscopes include geology, metallurgy, and industrial materials failure analysis.
- Scanning Probe Microscopes – These research microscopes allow investigators to see surfaces and specimens in 3D and at a level of detail never achieved with traditional light or electron microscopy.
- Acoustic Microscopes – Used to detect minute failures and imperfections in the surface of materials, the acoustic microscope permits users to perform their analysis without damaging or destroying the sample.
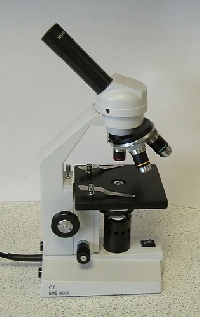
- Eyepiece
- Arm
- Objective lenses
- Stage controls
- Iris diaphragm
- Mechanical stage
- Illuminator
- Fine focus
- Coarse focus, and more
- Be sure to place your instrument on a flat surface
- Plug the power cord into a nearby outlet (it’s important to note that certain models don’t use electric lighting, but instead have a mirror which focuses natural light)
- Switch on the light source for your model; adjust the diaphragm to the largest hole diameter
- For machines with iris diaphragms, simply slide your lever until the most light comes through
- In order to look at a slide, rotate the nose piece to its lowest power setting — This way you will have a wider field of vision to start off
- Place a microscope slide on the stage; it can be either a prepared slide or one you created (i.e.: piece of yarn, hair fiber, etc.)
- Move your particular slide until it resides underneath the lens
- Turn the adjustable large coarse focus wheel (as seen on the Diagram) to bring your specimen into focus
- Once you have it the way you want it, adjust the smaller fine focus wheel
- From here, adjust the diaphragm to receive the best lighting. You will look to start with the most amount of lighting and then pare down until there is a sharp and clear contrast to the image
- You can scan the slide and/or change magnification levels — Try rotating the nose piece to the 10x objective (which means you’ll be getting 100x magnification), refocus, and readjust the lighting to get the clearest image available using more light this time for the higher power level
Resources:
Home Science Tools: How to Use a Microscope
Above photo attributed to tuchodi
Popular Savings Offers

.jpg)
10% OFF
Get 10% off when you sign up for texts and free shipping on your first order over $50

The Lighter Side


Free Catalog
Get your Free Catalog and shop the best selection and collection of Designer Drapery Hardware Products on the Clearance Sale

Designer Drapery Hardware
Free Catalog
Get FREE Catalog to browse Cabela's Camping products
.jpg)
Cabela's Camping


Free Catalog
Get your Free Catalog and shop the best selection and collection of Sturbridge Yankee Workshop Products on the Clearance Sale

Sturbridge Yankee Workshop


.jpg?w=3840 "Order Free Catalogs from SilverSingles")

.jpg?w=3840 "Order Free Catalogs from Jos A. Bank")


.jpg?w=3840 "Order Free Catalogs from Splendid Spoon")
.jpg?w=3840 "Order Free Catalogs from What to do if you no longer automatically qualify for Extra Help w/ Medicare prescription drug costs")
