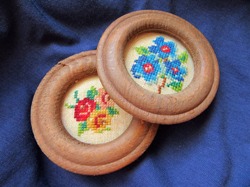
Prepare needlework for framing to give or display
Needlework is textile art that is created using a needle to produce decorative sewing. It includes such diverse crafts as quilting, applique, tapestry, embroidery, knitting, crocheting, needle lace, and even braiding and bead weaving.
Embroidery is one of the most popular types of needlecraft and itself has many subcategories including cross stitch, needlepoint, blackwork, whitework, and crewel.
The first step is to select a needlework project that fits your skill level, or challenges you just enough that you don’t get frustrated, and that will keep your attention for the time it takes to complete the project.
Once you have completed your needlework project you?ll want to frame it so you can display it with pride or give it as a special gift. This article explains how to frame cross stitch pieces.
Cleaning your piece
Before framing, you need to wash, dry, iron, and stretch your cross stitch piece so it will be in the best possible condition. However, it is crucial to first test both your fabric and your threads to make sure the colors do not run. It is also vital to use a very gentle soap that is free of phosphates. A special needlework soap is ideal.
~
Wash the piece gently by hand and do not wring it out. Instead, loosely roll it in a clean white towel until it is just damp. Then unroll and finish drying the fabric flat and away from sunlight. Before ironing, make sure your iron is completely clean. Lay the fabric design side down on a new clean white fluffy towel, smooth by hand, and cover with a clean tea towel. Iron with low to medium heat and work from the center out to evenly stretch the fabric while removing creases. Don?t forget to pay particular attention that all edges are lying flat. Keep lifting the tea towel to check on your progress.
After the fabric is dry and crease free, leave the piece lying flat for at least a day or two before framing to ensure that it is completely dry.
Buying the frame
While waiting, go shopping for an acid-free foam-core mounting board and that perfect frame, taking your piece?s measurements with you, as well as samples of the fabric and all thread colors that you used and a small ruler. Choose a frame that is the correct size to hold your finished piece after it has been mounted on a foam-core board. You?ll also want a frame that compliments your design, has a solid backing, and is deep enough to hold:
- a top sheet of plain glass to protect your piece from dust and smoke (non-reflective glass tends to mute colors and blur edges);
- two or three acid-free mats to keep your fabric away from the glass (mat openings should be graduated in size so that the color of the mat next to your fabric will show under the mat(s) above it);
- your finished piece after mounting;
- a bottom sheet of acid-free paper to protect the back of your fabric.
Wash the frame with your needlework soap and water, rinse thoroughly, and dry completely. This will prevent any colors from running and the fabric from yellowing after the piece is framed.
Mounting your piece
Your piece must be securely mounted to the mounting board in order to remain smooth, flat, and even in the frame. There are two ways to do this.
The first method is to mount with acid-free double-sided mounting tape that is available at any craft store. This video demonstrates mounting by this process.
For extra special pieces that will become extra-special gifts, you may wish to lace your piece around the board instead. This video demonstrates mounting by this process.
Finishing the framing
Place the frame on a clean surface facing down. Insert the glass after making sure it is clean and free from streaks or dust specks. Insert the mats in their proper order facing down. Insert your finished piece mounted to its board. Carefully flip the whole package over to check one last time for dust specks, etc.
Flip everything back over and cover the back with a layer of acid-free paper cut to size. Attach the frame backing that has the hanging hooks.
For the finishing touch, attach an adhesive label printed from your computer that says something like:
Name of piece, if any
Hand embroidered by
Your name
Date
Voila! You?re finished and you?ve made and framed the perfect masterpiece for display or gifting.

